Tuesday 3 September 2013

Add a new Language in sugarcrm

Note: You can also set the default language in the config.php. This value is used if a user does not specify a language while logging into the application.
Note: In the include/language/<new>.lang.php file, you will see that there are two global arrays defined. The $app_list_strings array is actually an array of arrays. The key values in this array must not be changed. There are comments and examples in the code that should keep you on track.

Dependent Dropdown in SugarCRM (SugarCE)


In order to make dependent dropdown, first you need to create 2 independent dropdown list from sugar admin panel. Let's say test_country and test_city with Item Name as below:

For test_country menu:
Item Name                    Display Name
AAA                             Thailand
BBB                              Nepal

For test_city menu:
Item Name                   Display Name
AAA_1                        Bangkok
AAA_2                        Phuket
BBB_1                         Lumbini
BBB_2                         Pokhara

Here you can see that if Item Name for country is AAA then the corresponding Item Name for city is AAA_1, AAA_2 i.e. it starts with AAA.

Now, add these dropdown fields in the corresponding edit view and detail view.
I am making dependent dropdown for 'test_test_module' ie my custom module.

Let's make a javascript file, say test_test_module.js. I have kept this file inside custom/modules/test_test_module folder.
/***********************************************************************/
//alert('hello');
var arr;
function Check() {
if(document.EditView.test_city|| document.EditView.test_country) {
      var test_city= document.EditView.test_city.options;
      arr = new Array;
      for(i=0; i< test_city.length; i++) {
         arr.push( test_city[i].value, test_city[i].text);
      }
  }
    initData();
}
function initData(){
 var current_p= document.EditView. test_country;
 var code_p = current_p.value;
 var current_v= document.EditView.test_city;
 var code_v = current_v.value;
 var code_v_idx = 0;
 var select_ticket = document.EditView.test_city.options;
 select_ticket.length=0;
 var l = 0;

 for(k=0; k<arr.length; k+=2) {
   if(arr[k].substr(0,3) == code_p || arr[k] == '') {
  select_ticket.length++;
  select_ticket[select_ticket.length-1].value = arr[k];
  select_ticket[select_ticket.length-1].text = arr[k+1];
  if(code_v == arr[k]){
      code_v_idx = l;
 }
  l++;
  }
 }
 if(code_p == ''){
  select_ticket[select_ticket.length-1].value = '';
 select_ticket[select_ticket.length-1].text = 'Select from DD1';
 }
 document.EditView.test_city.selectedIndex = code_v_idx;
}
if (window.addEventListener){
window.addEventListener("load", Check, false);
}else if (window.attachEvent){
window.attachEvent("onload", Check);
}else if (document.getElementById){
window.onload=Check;
}
/***************************************************************/
Inside templateMeata array in custom/modules/test_test_module/metadata/editviewdefs.php, define the location of the javascript file as below,
we can do it in two way:-
a>
'templateMeta' =>
    array (
    'includes' =>
      array (
        0 =>
        array (
          'file' =>'custom/modules/test_test_module/test_test_module.js',
        ),
      ),
      'maxColumns' => '2',
   
note : - Here only 'includes' key is important. but for better understanding extra code given above
b>
$viewdefs['test_test_module']['EditView']['templateMeta']['includes'][]['file'] = 'custom/modules/test_test_module/test_test_module.js';

last step :
In the same file i.e. editviewdefs.php, you will find dropdown menus you created i.e. test_country and test_city. Call the javascript function initdata() in test_country menu as below:
   array (
            'name' => 'test_country',
            'label' => 'LBL_AMITESH_DROPDOWN',
            'displayParams' => array (
                 'javascript' => 'onchange="initData();"'
                 ),
          ),
      
Since you want to change the value of city when the value of country is changed, you need to call the javascript function only from the test_country menu.


all d best :)


HOWTO: Create a Flex Relate for other modules

You may recall seeing this field in the various activity modules in Sugar:
This is what’s known as the “Flex Relate” field, which allows you to relate a record to one in a different module that you specify. This allows you to create a relationship where the target entity is flexible, which allows you to represent all sorts of business logic clearly. A great example of this the various activity entities in the app ( Calls, Meetings, Tasks ), which make it so you can relate the activity to one of many different record types.
The only downside of this field, is there’s no good way to build it using Module Builder or Studio ( or least in a very useful way ). However, it’s a pretty easy code customization you can do which is upgrade-safe. Let’s look at how.
We’ll assume we made a new custom module via Module Builder named test_flexparent, which will have a flex relate field that can relate to either the Contacts or Leads module. To do this, we must define the fields and relationships which will be needed to make this happen; we can do this by adding the file custom/Extension/modules/test_flexparent/Ext/Vardefs/flexrelate.php with the following contents:

<?php
 
$dictionary['test_flexparent']['fields']['parent_name'] = array(
'required' => false,
'source' => 'non-db',
'name' => 'parent_name',
'vname' => 'LBL_FLEX_RELATE',
'type' => 'parent',
'massupdate' => 0,
'comments' => '',
'help' => '',
'importable' => 'true',
'duplicate_merge' => 'disabled',
'duplicate_merge_dom_value' => '0',
'audited' => false,
'reportable' => true,
'len' => 25,
'size' => '20',
'options' => 'test_flexparent_options',
'studio' => 'visible',
'type_name' => 'parent_type',
'id_name' => 'parent_id',
'parent_type' => 'test_flexparent_options',
);
 
$dictionary['test_flexparent']['fields']['parent_type'] = array(
'required' => false,
'name' => 'parent_type',
'vname' => 'LBL_PARENT_TYPE',
'type' => 'parent_type',
'massupdate' => 0,
'comments' => '',
'help' => '',
'importable' => 'true',
'duplicate_merge' => 'disabled',
'duplicate_merge_dom_value' => 0,
'audited' => false,
'reportable' => true,
'len' => 255,
'size' => '20',
'dbType' => 'varchar',
'studio' => 'hidden',
);
 
$dictionary['test_flexparent']['fields']['parent_id'] = array(
'required' => false,
'name' => 'parent_id',
'vname' => 'LBL_PARENT_ID',
'type' => 'id',
'massupdate' => 0,
'comments' => '',
'help' => '',
'importable' => 'true',
'duplicate_merge' => 'disabled',
'duplicate_merge_dom_value' => 0,
'audited' => false,
'reportable' => true,
'len' => 36,
'size' => '20',
);
 
 
$dictionary['test_flexparent']['fields']['contacts'] = array(
'name' => 'contacts',
'type' => 'link',
'relationship' => 'test_flexparent_contacts',
'module'=>'Contacts',
'bean_name'=>'Contact',
'source'=>'non-db',
'vname'=>'LBL_CONTACTS',
);
 
$dictionary['test_flexparent']['fields']['leads'] = array(
'name' => 'leads',
'type' => 'link',
'relationship' => 'test_flexparent_leads',
'module'=>'Leads',
'bean_name'=>'Lead',
'source'=>'non-db',
'vname'=>'LBL_LEADS',
);
 
$dictionary['test_flexparent']['relationships']['test_flexparent_contacts'] = array(
'lhs_module' => 'test_flexparent',
'lhs_table' => 'test_flexparent',
'lhs_key' => 'parent_id',
'rhs_module' => 'Contacts',
'rhs_table' => 'contacts',
'rhs_key' => 'id',
'relationship_type' => 'one-to-many',
'relationship_role_column'=>'parent_type',
'relationship_role_column_value'=>'Contacts'
);
 
$dictionary['test_flexparent']['relationships']['test_flexparent_leads'] = array(
'lhs_module' => 'test_flexparent',
'lhs_table' => 'test_flexparent',
'lhs_key' => 'parent_id',
'rhs_module' => 'Leads',
'rhs_table' => 'leads',
'rhs_key' => 'id',
'relationship_type' => 'one-to-many',
'relationship_role_column'=>'parent_type',
'relationship_role_column_value'=>'Leads'
);
 
There are three parts to this file. The first part defines the three fields we have added to manage the relationship: parent_name, parent_id, and parent_type. We next add two link fields which will correspond to the relationships we’ll add for the links between this module and contacts and leads. Finally, we define the actual relationships themselves.
One more thing we need to do is add in the language files which specify the field’s string name as well as the dropdown. You can do this by adding a file named custom/Extension/application/Ext/Language/en_us.flexrelate.php.

<?php
 
$app_list_strings['moduleList']['test_flexparent'] = 'Flex Parent';
$app_list_strings['test_flexparent_options'] = array(
'' => '',
'Contacts' => 'Contact',
'Leads' => 'Lead',
);
 
Now after a Repair Relationships and a Quick Rebuild and Repair, the field will be available and you can add it to the module’s various views.
 
#troubleshoot1 :if it isn't work in custom/Extension/application/Ext/Language/en_us.flexrelate.php.  
 the place below written code in custom/Extension/include/Language/en_us.lang.php. in respect of above

 $GLOBALS['app_list_strings']['test_test_module_options'] = array( '' => '', 'Contacts' => 'Contact', 'Leads' => 'Lead', );

Friday 30 August 2013

SugarCRM Customization: Drop Down Fields

Looking to create a drop down field in SugarCRM?  

No problem.  Simply go to the customization Studio and add a new field of type "Drop Down," making sure to assign or create the appropriate drop down list at field creation time.

Simple enough, but that only works for custom fields.  What about changing an existing, default field so as to make it behave like a drop down.  For example, we might want to change the Subject field for Cases or the Name field for Opportunities into drop downs. 

Doing so would help us ensure uniformity in the classification of support inquiries or revenue opportunities, which in turn improves data quality and simplifies the measurement of effectiveness.  Ultimately, one of the goals of CRM technologies is to simplify the process of measuring how well your business is doing and the quality of the data in the system has a significant impact on that function.

So, how do we convert these default text fields to drop down fields?  Lets take a look.
Our first step is to determine if we need to define a new drop down list or if we are going to use an existing one.  

The drop down list contains the values that a user will be allowed to pick from for the field in question.  Note that the user must select a value from that list and will not be able to manually type in a random value.  As a result, the selected drop down list must contain appropriate values or we must create a new list that does.

We will assume we need to create new lists, respectively named 'cases_name_list' and 'opportunity_name_list.'  To create a new list, follow these steps:

1. Access SugarCRM as an admin level user.
2. Select Admin > Dropdown Editor
3. Click Add Dropdown

Proceed to name the list and enter the desired values.  Click Save when finished and repeat the process for the second list.

Now that the lists are ready, we need to connect them to the respective fields and instruct SugarCRM to make the fields behave like drop down fields.

To accomplish this, we need to do three things: create the PHP file with the instructions, place the file in the appropriate location within the SugarCRM install folder and lastly, execute a Repair operation within SugarCRM.

So what does the instruction file look like?  It is actually quite simple.  Create a file named vardefs.ext.php and add the following PHP code to it:

<?php
$dictionary['Case']['fields']['name']['type'] = 'enum';
$dictionary['Case']['fields']['name']['options'] = 'case_name_list';
?> 

That is all we need for the instructions.  

Now save the file and place it in the following folder: /custom/Extension/modules/Cases/Ext/Vardefs.  If the directory does not exist, proceed to manually create it via Windows Explorer or other similar tool appropriate for your operating system.  That completes the second step.  

To finalize the process, access SugarCRM using an admin level account and select Admin > Repair > Quick Repair and Rebuild.  

Take a look at the Cases module and the name field should now display as a drop down when in edit mode.

To complete the exercise and apply the modification to the Opportunities module, make another file named vardefs.ext.php, but with the following instructions:

<?php
$dictionary['Opportunity']['fields']['name']['type'] = 'enum';
$dictionary['Opportunity']['fields']['name']['options'] = 'opportunity_name_list';
?>

Place this version of the file in /custom/Extension/modules/Opportunities/Ext/Vardefs and rebuild!

To put value into   opportunity_name_list goto /custom/include/ and put the value there for the array of opportunity_name_list in associative array form.

Do the same for case_name_list.

Monday 26 August 2013

import csv file in custom module of sugarcrm


Step1:


  File path


<application>/module/<module name>/module name.php

  
Add property below in class in above file
   
      var $importable = true;
   
note : But this is core class/file so think how to do in  your custom class. 

Step2:

  File path<application>/Extension/Module/<module name>/Ext/Menu/menu.php

 add code below
<?php

if(!defined('sugarEntry') || !sugarEntry) die('Not A Valid Entry Point');

if(ACLController::checkAccess('amit_test_amitesh_module', 'import', true)) $module_menu[]=Array("index.php?module=Import&action=Step1&import_module=amit_test_amitesh_module&return_module=amit_test_amitesh_module&return_action=index", "Import","Import", 'amit_test_amitesh_module');

?>


now you will get result.
hope u like it, thanks.


Thursday 1 August 2013

Writing Drupal 7 Modules

Drupal is a powerful CMS right out of the box. But let's be honest. The real reason that Drupal has gained such traction in the crowded PHP CMS space isn't because it is loaded with bells and whistles, but because it can be extended in seemingly infinite ways through add-on modules. In fact, there are well over seven thousand modules available from Drupal.org. Why is it that Drupal enjoys such a wealth of user-contributed add-on code?
The answer is that Drupal's API (Application Programmer Interface) provides the golden combination of simplicity and power. Almost every phase of Drupal's page building process can be intercepted and the data modified. But powerful modules can still be written in just a few dozen lines of code.
In the next few pages we are going to create a module from scratch. We will build a module using the Block API – the system used to generate block content. The module we create in this article is going to provide a block that displays the number of members (user accounts) on the site.
This is how we will proceed:
  1. We will create a new module directory
  2. Then we will create a .info (dot-info) file to describe the module
  3. From here, we will create our basic .module (dot-module) file and introduce Drupal programming
  4. Next, we will create a couple of “block hooks” to define the behaviors of our new block
  5. Using the administration interface, we will turn on our new module and enable the block

Prerequisites

For this article, it is assumed that you have the following:
  • Basic PHP development knowledge
  • A running Drupal 7 instance with admin access
  • Access to the filesystem for your Drupal 7 instance
  • A code editor or PHP IDE
To get started, you will need a working Drupal 7 instance that you can access as an administrator. You will also need to be able to create files and directories inside of that Drupal installation. The examples in this article are done on a standard install of Drupal 7.0 with no contributed modules.

Creating a Module

Typically, a Drupal module has at least these three pieces:
  • A module directory that contains all module files
  • An information file
  • A module PHP code file
We will call our module membercount. In Drupal parlance, this name is called the machine name because it is the name Drupal (the machine) uses to reference the module.
Now that we have the machine name, we can create our module's directory. The default location for add-on modules is the sites/all/modules directory. In that directory, we will create a folder named with the module's machine name: membercount/.
Inside of this directory we will create two files. The first file, which we will see in the following section, will contain information about our module. The second one will contain the module's PHP source code.

The .info File

The first file in our module is the .info file. Drupal uses the .info file to determine details about the module, including whether the module can be installed and what other modules it depends upon. A .info file is always named with the machine name of the module, so our module must be named membercount.info.
The .info file contains a list of name/value pairs. This file isn't an ad hoc settings file where you can put any information that you wish. There are a dozen directives that can be placed inside of a module. We will be using only the few that are required.
name = Member Count
description = Provides a block that shows the number of members.
core = 7.x
The name directive is required in all .info files. Its purpose is to provide a human-readable name for the module.
The description directive should have a one-sentence description of what the module does.
The next directive, core, has a functional role. Drupal refers to this to make sure that the module can be installed. Attempting to install this module on a Drupal 6 system, for example, would generate an error.
All three of these directives are required.
To see all .info directives refer to http://drupal.org/node/542202.

Starting the .module File

The next file that we are going to create is the .module file, membercount.module. This file is automatically loaded by Drupal, which expects the file to contain PHP code. Like .info files, the base name of a .module file is the module's machine name.
For the most part, Drupal modules are written as procedural code. Typically, the preferred unit of organization for Drupal code is the function. Our module file will have a three functions in it. Here is the first:
<?php
/**
 * @file
 * The membercount module provides a block with member count information.
 */
 
/**
 * Implementation of hook_help().
 */
function membercount_help($path, $args) {
  if ($path == 'admin/help#membercount') {
    return t('To use this module, go to the block page and turn on the membercount block.');
  }
}
There are a couple things that I will note in passing, but which we don't have the space to examine more closely.
The first is the <?php processor instruction. This is required for any PHP files. Note, however, that there is no closing ?>. This is not only legal in PHP, but is considered a best practice for a file that is entirely source code. It prevents errors caused by premature buffer flushes.
The second thing is that it follows a very strict set of coding conventions. These conventions, described at http://drupal.org/node/360052, cover everything from indent depth (two spaces, no tabs) to naming conventions (lowercase with underscores), operators (one space on each side), and comment styles. Drupal developers are expected to follow these conventions in order to maximize the readability across the codebase.
The next thing of note is the use of documentation blocks. Documentation blocks are a special kind of comment that begins with /** and ends with */. The purpose of these sections is to provide source code documentation that can be extracted by automated tools. Every PHP file should have a file-level documentation block (which is flagged with the @file tag). Each function should also have a documentation block.
Now we are ready to look at the function declared in the file above. The membercount_help() function provides help text for the module. By declaring this help function as above it is now available to Drupal. If we were to install the module as it is and go visit the help page, we would be able to see this help text under the Member Count module.
Member Count module
Drupal has picked up our help function and integrated it into its help system. How did it do this?
This is where Drupal's cornerstone feature comes into play. Drupal uses a callback-like system called hooks. At strategic times during page processing, Drupal looks for any functions that follow a specific naming pattern (hook functions) and it invokes all matching functions. For example, when generating help text Drupal looks for anything that implements hook_help(). It then executes all of the matching functions, gathers the returned data, and displays the requested help page. To implement hook_help(), all we need to do is declare a function where the hook part of the name is replaced with our module's machine name: membercount_help().
Declare a function according to a predefined hook pattern and Drupal will just pick it up and use it. This is why Drupal is so easy to extend.
Of course there is a little more to it then that. You need to know what each hook invocation will give as input, and what output your hook is expected to return. In our example above, hook_help() implementations will get two arguments:
  • $path: The help path. A top level help screen will always get the path admin/help#MODULENAME.
  • $arg: Additional arguments passed in the URL.
The hook will be executed for any call to the help system, so it is up to us to determine whether the help call is one that we should answer. That is why the body of our help function looks like this:
if ($path == 'admin/help#membercount') {
  return t('To use this module, go to the block page and turn on the membercount block.');
}
In short, we only answer this request for help if the $path is set to 'admin/help#membercount'. In a more complex module we might have an entire help system where different paths contained information about different parts of the system.
Any request to hook_help() expects one of two things to be returned: a NULL value or a string of help text. While NULLs are ignored, strings are prepared and displayed. In practice, modules should have informative help text, but for the sake of illustration we have kept ours very short.
Notice that the string isn't simply returned. It's passed through the t() function. The t() function is primarily for translating strings into non-English languages. But t() performs other tasks as well. It can be used to insert values into strings (like the sprintf() family of functions) and to do some output filtering before data is sent to the client. The t() function is documented at http://api.drupal.org/api/drupal/includes--bootstrap.inc/function/t/7.

Five other Drupal functions you ought to know

The article introduces several important Drupal functions. Here are a few other commonly used Drupal functions.
  1. theme(): Pass data to the theme system for formatting
  2. l(): Transform a label and URI into a link
  3. module_invoke_all(): Execute a hook in all modules
  4. drupal_set_message(): Print a notice or error to the user
  5. watchdog(): Log a message to the Drupal log

Any string that contains output that is on its way to a user should be passed through the t() function. And this should happen when the string is declared. In other words, the following code is wrong:
$foo = 'This is my string.';
$bar = t($foo);
In order for the translation system to function correctly, t() should always be used like this:
$bar = t('This is my string.');
In the next section we are going to create a block.

Block Hooks

In Drupal, the block system is used for placing chunks of content around the periphery of the page. Blocks are administered through the Toolbar » Structure » Blocks page, where they can be positioned and configured.
Our module is going to provide a simple block that lists the number of accounts that exist on our site. To accomplish this, we are going to need to implement two hooks:
  • hook_block_info(): Tell Drupal about the block that we declare.
  • hook_block_view(): Answer a request to return a block's data.
There are other block hooks that we could implement, but for this example we can get by with just these two.
The first hook provides the information necessary to tell Drupal about all of the blocks that this module provides. Since our module only provides one block, our hook implementation is simple:
/**
 * Implements hook_block_info().
 */
function membercount_block_info() {
  $blocks = array();
 
  $blocks['count_members'] = array(
    'info' => t('Count Members'),
    'cache' => DRUPAL_NO_CACHE,
  );
 
  return $blocks;
}
This hook provides the settings for each block that the module declares. The block info hook takes no parameters and returns an associative array where the keys are the machine names of each block, and the values are an associative array of settings for each block.
Our module declares one block called count_members. And we are assigning it two settings:
  • info: This is required for every block. It should contain a short phrase describing the block. It is displayed only on block administration pages.
  • cache: This second flag uses one of the DRUPAL_ cache constants to tell Drupal whether it can cache the data, and if so, how it should cache the data. These flags are all documented at http://api.drupal.org/api/drupal/modules--block--block.api.php/function/.... We assign it the value DRUPAL_NO_CACHE, which tells Drupal not to cache the output of this block.
There are a few other possible settings, but these two are the ones typically used.
Now that we have provided this hook our block will be included in the list of available blocks. Next, we need to provide the content that our block will return by implementing hook_block_view().
/**
 * Implements hook_block_view().
 */
function membercount_block_view($name) {
 
  if ($name == 'count_members') {
    $count = db_query('SELECT COUNT(uid) - 1 FROM {users}')->fetchField();
 
    $content = format_plural($count, 'This site has 1 user.', 'This site has @count users.');
 
    $block = array(
      'subject' => t('Members'),
      'content' => $content,
    );
 
    return $block;
  }
}
Just as the hook_block_info() function was expected to produce block information for all blocks that the module declares, hook_block_view() is expected to produce the viewable content for any block that this module is responsible for. Thus, our block hook only responds when the name passed into the function matches the name we declared in the $blocks array in membercount_block_info().
Inside of the if statement our block function does four things:
  1. Query the database to find out how many users we have.
  2. Format the string to be returned.
  3. Create the block data structure (an associative array).
  4. Return the block.
      Our database query is simple:
      SELECT COUNT(uid) - 1 FROM {users}
      This selects the number of user IDs (minus one) from the users table. The users table is the main location for information about Drupal users. There is one record for each user of the system, plus one for the "anonymous" user. Since we don't want to include the anonymous account in our tally we subtract one.
      When writing SELECT queries in Drupal, the syntax used is a slightly modified SQL. Notice that in Drupal queries, table names are always surrounded with curly braces ({}). This is so that on hosts that have stricter naming conventions, database table name prefixing can be done without requiring a manual rewrite of all SQL statements. These and other details of Drupal database syntax are documented here: http://api.drupal.org/api/drupal/includes--database--database.inc/group/....
      The database query is executed using the db_query() function. It executes a simple query and returns an instance of a DatabaseStatementInterface. Since our query returned only one field (the results of the SQL COUNT()) we can use the fetchField() method to get the data for that single field.
      The next line of our block function takes the $count value and uses it to construct a string for display:
      $content = format_plural($count, 'This site has 1 user.', 'This site has @count users.');
      This line shows another interesting facet of Drupal's translation subsystem. Along with t(), Drupal provides other functions to handle translation difficulties. Human languages construct plurals in different ways. The pattern used in English is not the same as that in French, Hungarian, or Chinese. So strings that need to be translated differently depending on a number can be passed through the format_plural() function. In the default English case it will see if the $count value is 1. If so, it will use the first string (This site has 1 user). Otherwise it will use the second (plural) construction, substituting $count for the placeholder @count.
      The next thing to do is construct the data structure that Drupal is expecting this function to return: an associative array with two keys:
    • subject: The title of the block, which may be shown to the user.
    • content: The formatted body of the block.
    For our block, we set the subject to Members (and we pass it through t() for translation). The content is simply the $content variable. For a more complex block, we might use the theme() function to theme the data before setting it here. Finally, we return the block, allowing Drupal to continue assembling the blocks and rendering the page.

    Installing and Configuring Our Module

    We now have a complete module. Since we created it in sites/all/modules, installing it is a breeze. We can simply navigate to Toolbar » Modules and find it in the list:
    Module install
    Notice that the Name and Description columns pull their data from the membercount.info file we created earlier.
    Simply checking the box and clicking on the Save configuration button will enable our new module. It should then show up as enabled, and since we implemented hook_help(), we see a help icon in the right-hand column:
    Help icon
    Now we are ready to test out our module. Go to Toolbar » Structure » Blocks and position the block. Initially, there should be an entry named Count Members in the Disabled blocks list. We will put it in the Header section:
    Block screen
    Clicking Save blocks at the bottom of the page will save this change. Now we should be able to close the Administration overlay and see the results of our new block in the upper-right corner.
    Header output

    Conclusion

    We have created our first working Drupal 7 module. At this point, you've gotten a small dose of coding in Drupal, though we have barely scratched the surface of what can be done. There is virtually no part of Drupal's page rendering that you can't modify through Drupal's APIs. And most of the time, modifying Drupal is just a matter of declaring a new module and writing the right hooks.
    The module we have created here is as basic as they come. More complex modules may contain multiple PHP source files, JavaScript files, and even templates, CSS, and images. It is even possible to group several modules together to create larger bundles of related features.
    Ready to move on? There are plenty of resources out there to help you get going, and Drupal.org is a great place to start.
To create a basic page to Drupal 7:
  1. Log into your Drupal 7 Dashboard
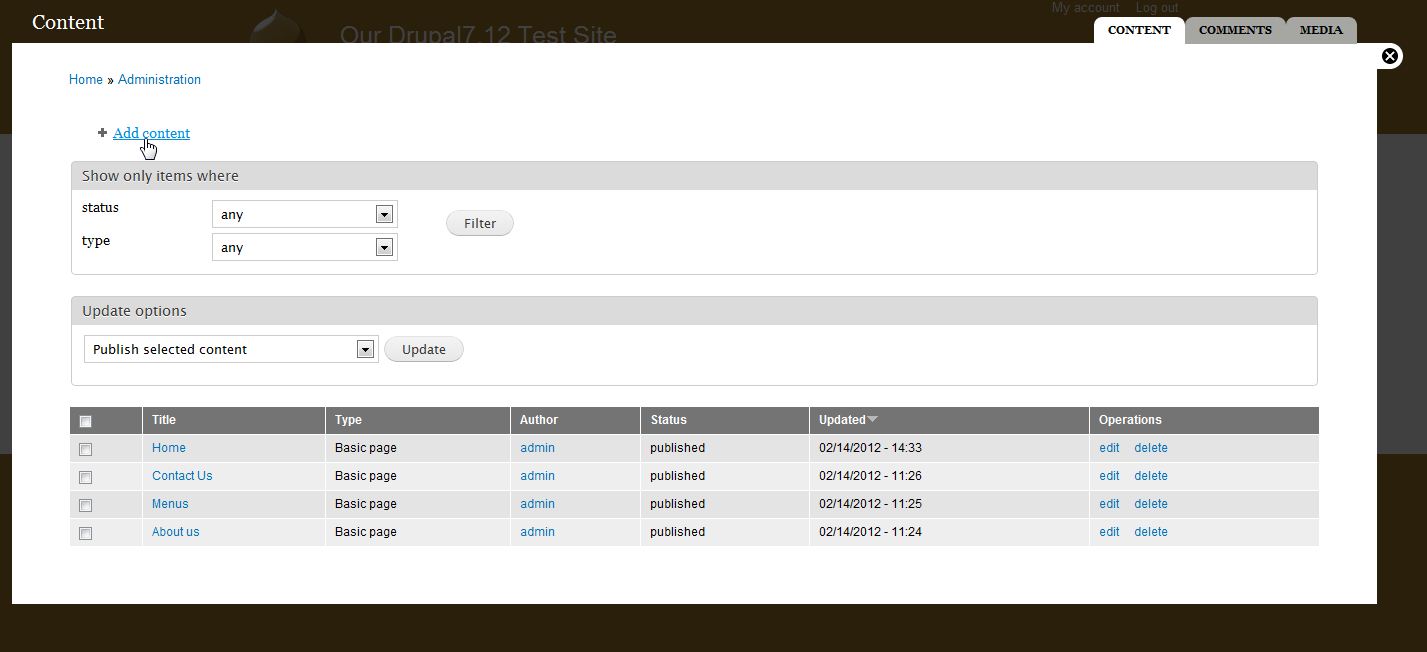
  2. In the top menu, click Content
  3. Click the Add content link at the top of the page.
    drupal_content_1
  4. From here, select Basic page from the list of different content types.
    drupal_content_2
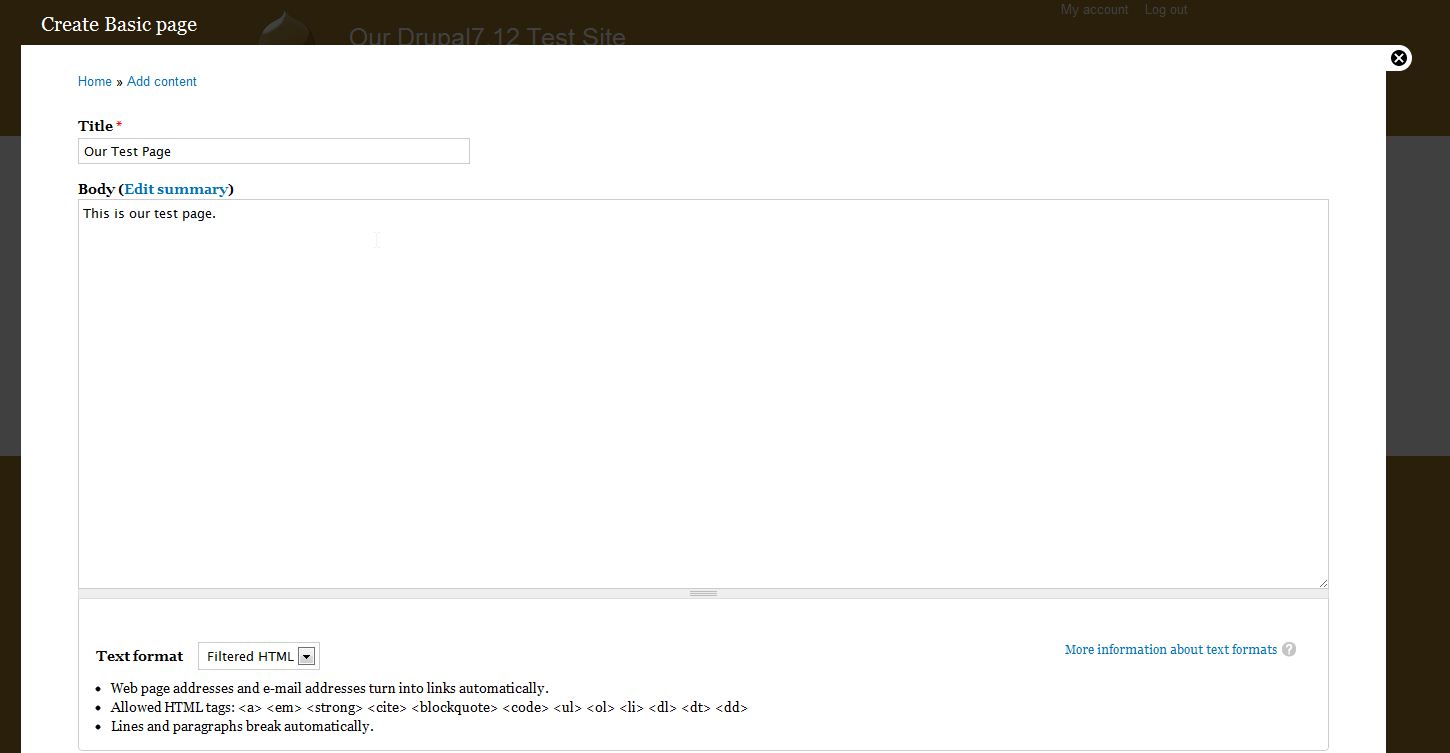
  5. Fill in the Title and Body, and also select a type of text format.
    Title Enter a title for you new page. In our testing we entered Our Test Page, but you could use anything that you would like, such as About Us.
    Body The body is the bulk of the content for this new page. If this was an About Us page, this would be were you would enter the information about yourself or your organization. In our example, we simply entered This is our test page.
    Text Format When selecting a text format, you have the following options:

    - Filtered HTML
    - Full HTML
    - Plain Text
    Underneath the drop down that contains these choices, you will see notes explaining the choice iteself. For example, you may see a notice telling you that the option you have selected does not allow any HTML tags. As you change your option, the notes underneath will change as well.
    drupal_content_3
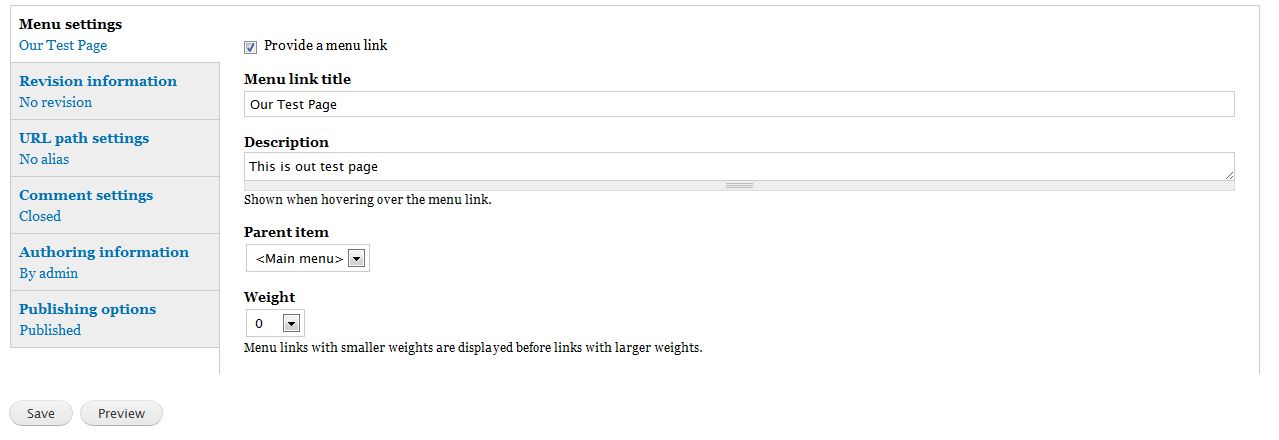
  6. There are a few other options you can specify. To change any of these settings, click the appropriate link at the bottom of the basic page editor.

    Menu Settings
    If we don't click the checkbox for Provide a menu link, we won't be able to find our page (in this specific example).

    We have checked that box, and the following settings appear:
    Menu Link Title When this link appears in a menu, this will be the text that users can click on to get to this page.
    Description If a user mouses over this link, after a moment the description you type here will show.
    Parent Item Choose the parent item for this page. For example, if we later created a Company History page, we may want to file it underAbout Us, and we could do that here.
    Weight you can adjust the weight to change in which order this link will appear.
    Revision Information If you have multiple authors or if you just like keeping detailed notes, in the revision information section you can enter a description about the changes you are making to the page.
    URL Path Settings This option allows us to specify a custom url alias. For example, if we leave this option blank, the URL will look similar to:

    BLANK:
    http://domain.com/node/1

    ... if we enter a value here, such as about-this-site, the url will look like the following:
    http://domain.com/about-this-site 
    Comment Settings If you would like to change the commenting settings for this particular page, you can do so here. For example, if you don't want to allow anyone to post a comment, select the option for Closed - users cannot post comments.
    Authoring Information In this section, you can set custom details about both who wrote the article and when it was published.
    Publishing Option - Published: if you don't have this option selected, your page will not be active and will not show up on your website.
    - Promoted to front page: selecting this option will put this page on your site's front page (homepage)
    - Sticky at top of lists: as the name implies, if this page appears anywhere within your site with other pages in a list type format, this page will be situated towards the top of the page. 

    drupal_content_4
  7. Click Save once you have filled in all the desired information.

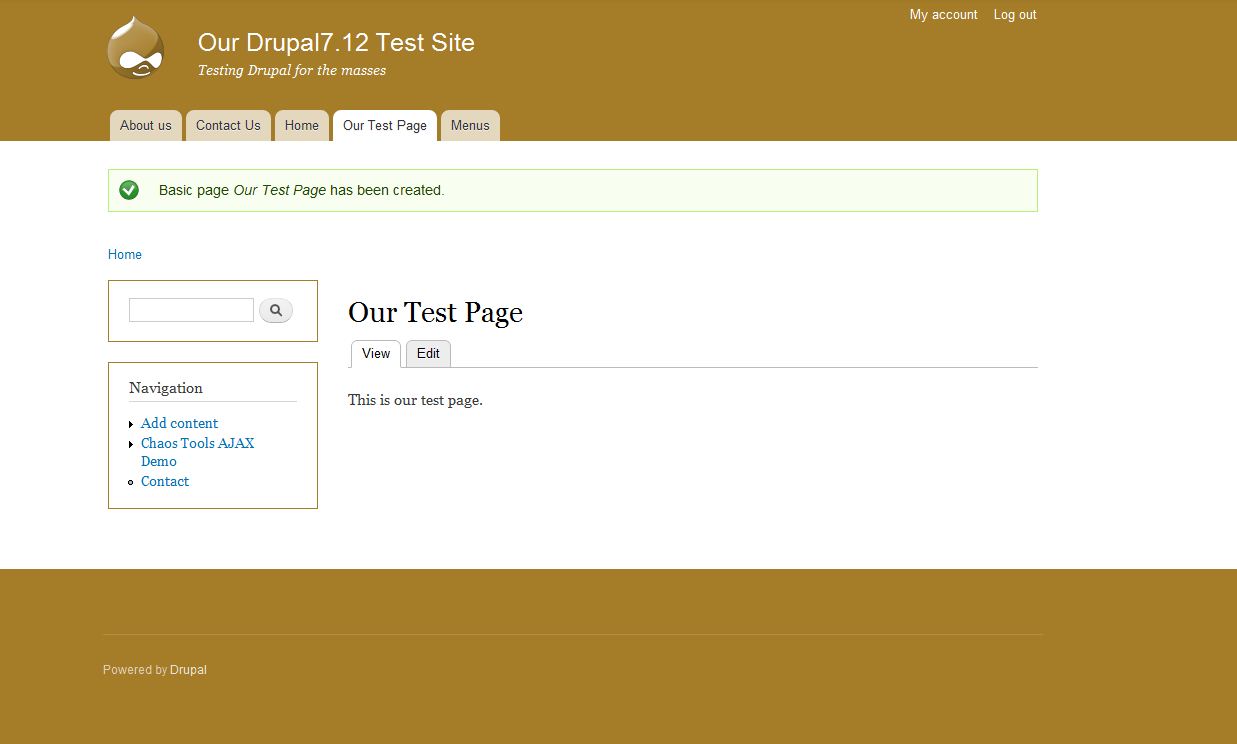
    Now, when you visit your site and click on the link you created in the menu (if you did create the menu item as we did above), you will see the page you just created!
    drupal_content_5